

It’s possible to set-up your own website for free (minus the cost of running a computer and the internet connection that you probably already have). Here are the steps I used.
Step 1
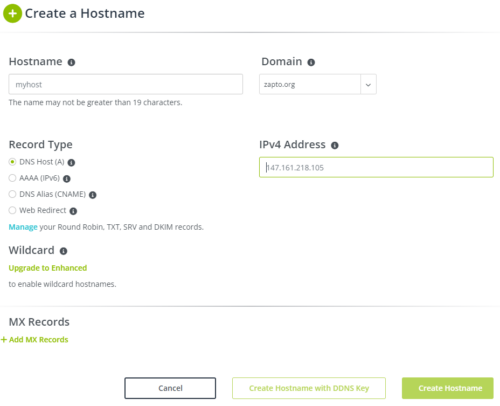
Create an account at noip.com (or any other similar service) and get a URL you like.
Get a DDNS Key
Step 2
Build a Linux server, either a physical one or on something like VirtualBox. You want to make sure it either has a static address or will always be given the same address by your DHCP server.
Step 3
Install all the required packages, users, databases and software. Running an Ansible playbook can make this much easier. I used the below playbook. The lookups for the hashi_vault values are just a way of keeping secrets secure if you have installed something like HashiCorp Vault. The secrets could also be in an Ansible vault or just in the playbook (although that’s not very secure).
---
- hosts: wordpress
  become: yes
  vars_prompt:
    - name: "installation_number"
      prompt: "Enter the installation number"
      private: no
  vars:
    # HashiCorp Vault configuration values
    vault_secret_path: "kv/data/wordpress{{ installation_number }}"
    db_name: "{{ lookup('hashi_vault', 'secret=' ~ vault_secret_path)['db_name'] }}"
    db_user: "{{ lookup('hashi_vault', 'secret=' ~ vault_secret_path)['db_user'] }}"
    db_password: "{{ lookup('hashi_vault', 'secret=' ~ vault_secret_path)['db_password'] }}"
    db_root_password: "{{ lookup('hashi_vault', 'secret=' ~ vault_secret_path)['db_root_password'] }}"
    admin_email: "{{ lookup('hashi_vault', 'secret=' ~ vault_secret_path)['admin_email'] }}"
    wp_url: "{{ lookup('hashi_vault', 'secret=' ~ vault_secret_path)['wp_url'] }}"
    wordpress_install_path: "/var/www/html/{{ wp_url }}"
  tasks:
    - name: Fail if installation_number is not numeric
      ansible.builtin.fail:
        msg: "Installation number must be numeric."
      when: installation_number is not match("^[0-9]+$")

    - name: Install necessary packages
      apt:
        name:
          - apache2
          - mariadb-server
          - php
          - php-mysql
          - libapache2-mod-php
          - php-cli
          - php-curl
          - php-gd
          - php-mbstring
          - php-xml
          - php-xmlrpc
          - php-soap
          - php-intl
          - php-zip
          - php-mail
          - python3-pymysql
          - certbot
          - python3-certbot-apache
          - imagemagick
          - p7zip-full
          - php-imagick
          - optipng
          - libjpeg-progs
        state: present
        update_cache: yes

    - name: Start and enable Apache
      service:
        name: apache2
        state: started
        enabled: yes

    - name: Start and enable MariaDB
      service:
        name: mariadb
        state: started
        enabled: yes

    - name: Set initial MariaDB root password
      shell: |
        mysql -u root -e "ALTER USER 'root'@'localhost' IDENTIFIED BY '{{ db_root_password }}'; FLUSH PRIVILEGES;"
      ignore_errors: yes

    - name: Remove anonymous users
      community.mysql.mysql_user:
        name: ''
        host_all: yes
        state: absent
        login_user: root
        login_password: "{{ db_root_password }}"

    - name: Disallow root login remotely
      community.mysql.mysql_user:
        name: root
        host: "{{ item }}"
        state: absent
        login_user: root
        login_password: "{{ db_root_password }}"
      with_items:
        - "{{ ansible_hostname }}"
        - 127.0.0.1
        - ::1

    - name: Remove test database
      community.mysql.mysql_db:
        name: test
        state: absent
        login_user: root
        login_password: "{{ db_root_password }}"

    - name: Reload privilege tables
      community.mysql.mysql_user:
        name: root
        host_all: yes
        priv: '*.*:ALL,GRANT'
        state: present
        login_user: root
        login_password: "{{ db_root_password }}"

    - name: Create WordPress database
      community.mysql.mysql_db:
        name: "{{ db_name }}"
        state: present
        login_user: root
        login_password: "{{ db_root_password }}"

    - name: Create WordPress user
      community.mysql.mysql_user:
        name: "{{ db_user }}"
        password: "{{ db_password }}"
        priv: "{{ db_name }}.*:ALL"
        state: present
        login_user: root
        login_password: "{{ db_root_password }}"

    - name: Download WordPress
      get_url:
        url: https://wordpress.org/latest.tar.gz
        dest: /tmp/wordpress.tar.gz

    - name: Create target directory
      file:
        path: "{{ wordpress_install_path }}"
        state: directory
        owner: www-data
        group: www-data
        mode: '0755'

    - name: Extract WordPress archive without top-level directory
      unarchive:
        src: /tmp/wordpress.tar.gz
        dest: "{{ wordpress_install_path }}"
        remote_src: yes
        extra_opts: [ "--strip-components=1" ]

    - name: Set permissions on WordPress directory
      file:
        path: "{{ wordpress_install_path }}"
        owner: www-data
        group: www-data
        state: directory
        recurse: yes

    - name: Fetch WordPress salts
      uri:
        url: https://api.wordpress.org/secret-key/1.1/salt/
        return_content: yes
      register: wp_salts

    - name: Create wp-config.php
      template:
        src: wp-config.php.j2
        dest: "{{ wordpress_install_path }}/wp-config.php"
        owner: www-data
        group: www-data
        mode: '0644'

    - name: Remove WordPress archive
      file:
        path: /tmp/latest.tar.gz
        state: absent

    - name: Configure Apache http for WordPress
      copy:
        content: |
          <VirtualHost *:80>
              ServerAdmin webmaster@localhost
              DocumentRoot {{ wordpress_install_path }}
              ServerName {{ wp_url }}

              <Directory {{ wordpress_install_path }}>
                  Options FollowSymLinks
                  AllowOverride All
                  Require all granted
              </Directory>

              <Directory {{ wordpress_install_path }}/wp-content>
                  Options FollowSymLinks
                  Require all granted
              </Directory>

              ErrorLog ${APACHE_LOG_DIR}/error.log
              CustomLog ${APACHE_LOG_DIR}/access.log combined

              RewriteEngine on
              RewriteCond %{SERVER_NAME} ={{ wp_url }}
              RewriteRule ^ https://%{SERVER_NAME}%{REQUEST_URI} [END,NE,R=permanent]
          </VirtualHost>
        dest: /etc/apache2/sites-available/{{ wp_url }}.conf

    - name: Configure Apache https for WordPress
      copy:
        content: |
          <IfModule mod_ssl.c>
          <VirtualHost *:443>
              ServerAdmin webmaster@localhost
              DocumentRoot {{ wordpress_install_path }}
              ServerName {{ wp_url }}

              <Directory {{ wordpress_install_path }}>
                  Options FollowSymLinks
                  AllowOverride All
                  Require all granted
              </Directory>

              <Directory {{ wordpress_install_path }}/wp-content>
                  Options FollowSymLinks
                  Require all granted
              </Directory>

              ErrorLog ${APACHE_LOG_DIR}/error.log
              CustomLog ${APACHE_LOG_DIR}/access.log combined

          </VirtualHost>
          </IfModule>
        dest: /etc/apache2/sites-available/{{ wp_url }}-ssl.conf

    - name: Enable WordPress http site
      command: a2ensite {{ wp_url }}.conf

    - name: Enable WordPress https site
      command: a2ensite {{ wp_url }}-ssl.conf

    - name: Disable default Apache site
      command: a2dissite 000-default.conf

    - name: Enable Apache rewrite module
      command: a2enmod rewrite

    - name: Restart Apache
      service:
        name: apache2
        state: restarted

    - name: Obtain Let's Encrypt certificate
      command: >
        certbot --apache --non-interactive --agree-tos
        --redirect --email {{ admin_email }}
        -d {{ wp_url }}
      notify: Restart Apache

    - name: Set up auto-renewal cron job
      cron:
        name: "Renew Let's Encrypt certificates"
        job: "certbot renew --quiet"
        minute: "0"
        hour: "3"

  handlers:
    - name: Restart Apache
      service:
        name: apache2
        state: restarted
You will also need a Jinja2 template for the php config called wp-config.php.j2 in a templates directory (just down from the playbook). It contains the following.
<?php
define('DB_NAME', '{{ db_name }}');
define('DB_USER', '{{ db_user }}');
define('DB_PASSWORD', '{{ db_password }}');
define('DB_HOST', 'localhost');
define('DB_CHARSET', 'utf8');
define('DB_COLLATE', '');
$table_prefix = 'wp_';
define('WP_DEBUG', false);

{{ wp_salts.content }}

if ( !defined('ABSPATH') )
    define('ABSPATH', dirname(__FILE__) . '/');
require_once(ABSPATH . 'wp-settings.php');
Step 4
Connect to your server via a browser, where you can setup an admin user (preferably don’t call it admin and don’t make it the account you are going to publish under, that can be set-up later).
Step 5
Check if your ISP is blocking ports 80 and 443 by default. If they are, hopefully they will let you turn that off in their management console. Configure your router to forward ports 80 and 443 to your webserver (almost all routers have this as a virtual host, port forwarding, poxy or something similar).
Step 6
On your new webserver, install the noip-duc client to update your DDNS IP address. First check your architecture.
uname -mGet the package.
wget --content-disposition https://www.noip.com/download/linux/latest
tar xf noip-duc_3.3.0.tar.gz
Install the correct version
cd /home/$USER/noip-duc_3.3.0/binaries && sudo apt install ./noip-duc_3.3.0_{architecture}.debYou should then test the following command and set it up to run regularly in the cron.
noip-duc -g all.ddnskey.com --username <DDNS Key Username> --password <DDNS Key Password>Step 7
Certbot should already have been configured to get a letsencrypt certificate and keep it updated, but if you are installing manually you can run the following command.
certbot --apacheIt will configure it’s own cron job, so you don’t have to worry about that.
Conclusion
You should then be able to connect with a secure encrypted connection to your new webserver at the URL you configured. The cron jobs will maintain your DDNS address (if your IP changes) and a valid certificate. No-ip will send you an email every 30 days to renew your address. If you want to help support them and avoid the hassle of renewals, you can get a subscription for a small fee, but this isn’t essential.
Extras, Themes and Plugins
That’s all you really need to get the site running, but then you can customise it to your needs. There are hundreds of different themes, so you can pick the look you want. I went with Septera, because it was used on some of the SCA pages, and I liked the look of it. I also installed the following Plug-ins:
- All in One WP Security – It patched some obvious security holes and gave some nice features like Time-based One Time Passwords (TOTP).
- Code Click-to-Copy by WPJohnny – Which lets users click on the code examples to copy them.
- Edit Author Slug – Which fixes the one security issue that doesn’t seem to be fixed by the all in one plugin above, in that you can hide the actual user ids and use the author’s name instead.
- EWWW Image Optimizer – To get a good overview of the different resolutions of images you have pre-rendered.
- FluentSMTP – To send email via an existing account. I did manage to get native Postfix to send and receive via the website’s domain, but there were still a few issues and problems, this plugin is much simpler.
- Imsanity – So I don’t have to set specific limits or worry about converting images before I upload them, this plugin automatically converts them to a sensible size and resolution.
- Ninja Forms – It’s just the contact form at the moment, but I will probably use it for other things.
- PrettyLinks – You can create short links on your site that point to other URLs. Good for if the address might change or just so you don’t have to remember a complicated address. Also, handy if you have something to sell (which I don’t).
- Responsive Lightbox & Gallery – Lets users click on the pictures to view the full-size image and cycle through all the pictures in a post (if you sort them into folders).
- SearchWP Modal Search Form – I seemed to need this to get the site search link to work.
- WP Statistics – A simple statistics app that keeps the data local and lets you know if anyone is visiting the site.
- Yoast SEO – Helps search engines index your site and helps people find it (maybe, I guess that takes a while).
I chose all these plug-ins, because they had the functionality I needed in a free edition. Most of them have a premium, pro or subscription option, but so far I haven’t needed that.